32 型化陣列:處理二進制資料(進階)
- 32.1 API 的基礎
- 32.1.1 型化陣列的用例
- 32.1.2 核心類別:
ArrayBuffer、型化陣列、DataView - 32.1.3 使用型化陣列
- 32.1.4 使用資料檢視
- 32.2 元素類型
- 32.3 更多關於型化陣列的資訊
- 32.3.1 靜態方法
«ElementType»Array.from() - 32.3.2 型化陣列是可迭代的
- 32.3.3 型化陣列與一般陣列
- 32.3.4 將型化陣列轉換為一般陣列,反之亦然
- 32.3.5 串接型化陣列
- 32.3.1 靜態方法
- 32.4 快速參考:索引與偏移
- 32.5 快速參考:陣列緩衝區
- 32.5.1
new ArrayBuffer() - 32.5.2
ArrayBuffer的靜態方法 - 32.5.3
ArrayBuffer.prototype的屬性
- 32.5.1
- 32.6 快速參考:型化陣列
- 32.6.1
TypedArray<T>的靜態方法 - 32.6.2
TypedArray<T>.prototype的屬性 - 32.6.3
new «ElementType»Array() - 32.6.4
«ElementType»Array的靜態屬性 - 32.6.5
«ElementType»Array.prototype的屬性
- 32.6.1
- 32.7 快速參考:資料檢視
- 32.7.1
new DataView() - 32.7.2
DataView.prototype的屬性
- 32.7.1
32.1 API 的基礎
網路上許多資料都是文字:JSON 檔案、HTML 檔案、CSS 檔案、JavaScript 程式碼等。JavaScript 透過內建字串妥善處理此類資料。
不過,在 2011 年之前,它無法妥善處理二進制資料。Typed Array 規格 1.0 於 2011 年 2 月 8 日推出,並提供處理二進制資料的工具。有了 ECMAScript 6,Typed Array 已新增至核心語言,並獲得先前僅適用於一般陣列的方法(.map()、.filter() 等)。
32.1.1 Typed Array 的使用案例
Typed Array 的主要使用案例為
- 處理二進制資料:管理影像資料、處理二進制檔案、處理二進制網路協定等。
- 與原生 API 互動:原生 API 通常以二進制格式接收和傳回資料,而您無法在 ES6 前的 JavaScript 中儲存或妥善處理這些資料。這表示每當您與此類 API 進行通訊時,資料都必須在每次呼叫時從 JavaScript 轉換為二進制,反之亦然。Typed Array 消除了此瓶頸。與原生 API 進行通訊的一個範例是 WebGL,而 Typed Array 最初就是為此而建立的。HTML5 Rocks 的文章 “Typed Array 的歷史” 一節(由 Ilmari Heikkinen 撰寫)有更多資訊。
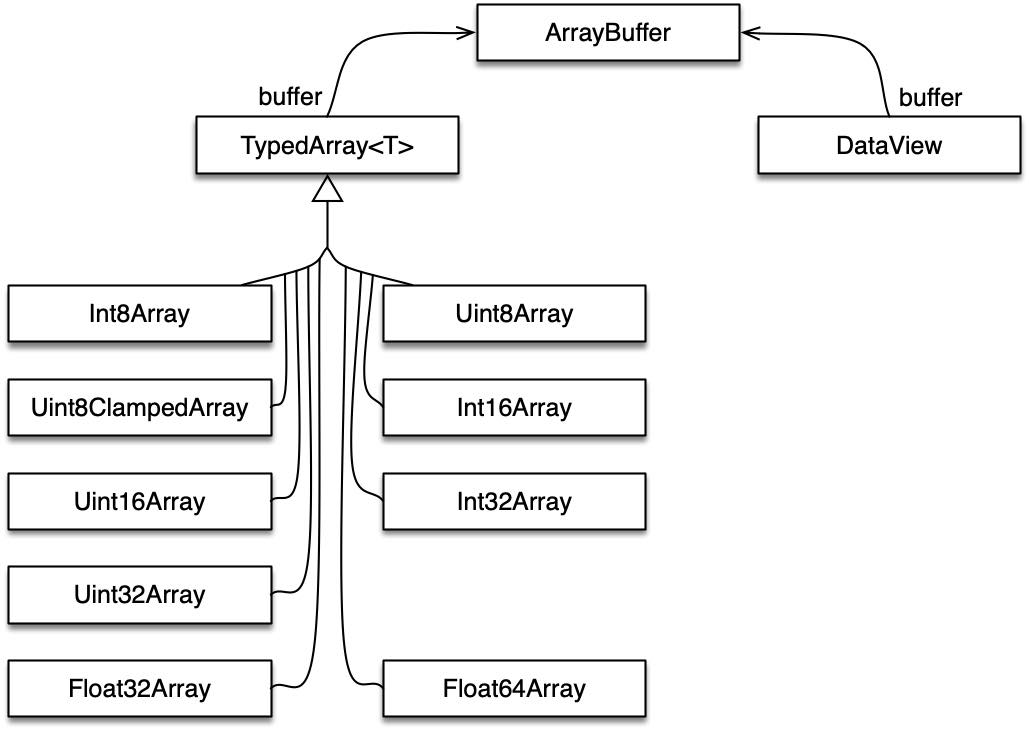
32.1.2 核心類別:ArrayBuffer、Typed Array、DataView
Typed Array API 會將二進制資料儲存在 ArrayBuffer 的執行個體中
const buf = new ArrayBuffer(4); // length in bytes
  // buf is initialized with zeros
ArrayBuffer 本身是一個黑盒子:如果您想要存取其資料,您必須將其包裝在另一個物件中,也就是檢視物件。有兩種檢視物件可用
- Typed Array:讓您可以存取資料,視為元素的索引順序,而所有元素都具有相同的類型。範例包括
Uint8Array:元素是無符號 8 位元整數。無符號表示其範圍從 0 開始。Int16Array:元素是有符號 16 位元整數。有符號表示它們有符號,可以是負數、零或正數。Float32Array:元素是 32 位元浮點數。
- DataView:讓您可以將資料詮釋為各種類型(
Uint8、Int16、Float32等),您可以在任何位元組偏移量讀取和寫入這些類型。
圖 20 顯示 API 的類別圖。
32.1.3 使用 Typed Array
Typed Array 的使用方式與一般陣列很像,但有一些顯著的差異
- Typed Array 會將資料儲存在 ArrayBuffer 中。
- 所有元素都初始化為零。
- 所有元素都具有相同的類型。寫入值到 Typed Array 會將其強制轉換為該類型。讀取值會產生一般數字或 bigint。
- Typed Array 的長度是不可變的;無法變更。
- Typed Array 不能有洞。
32.1.3.1 建立 Typed Array
以下程式碼顯示建立相同 Typed Array 的三種不同方式
// Argument: Typed Array or Array-like object
const ta1 = new Uint8Array([0, 1, 2]);

const ta2 = Uint8Array.of(0, 1, 2);

const ta3 = new Uint8Array(3); // length of Typed Array
ta3[0] = 0;
ta3[1] = 1;
ta3[2] = 2;

assert.deepEqual(ta1, ta2);
assert.deepEqual(ta1, ta3);
32.1.3.2 包裝的 ArrayBuffer
const typedArray = new Int16Array(2); // 2 elements
assert.equal(typedArray.length, 2);

assert.deepEqual(
  typedArray.buffer, new ArrayBuffer(4)); // 4 bytes
32.1.3.3 取得和設定元素
const typedArray = new Int16Array(2);

assert.equal(typedArray[1], 0); // initialized with 0
typedArray[1] = 72;
assert.equal(typedArray[1], 72);
32.1.4 使用 DataView
DataView 的使用方式如下
const dataView = new DataView(new ArrayBuffer(4));
assert.equal(dataView.getInt16(0), 0);
assert.equal(dataView.getUint8(0), 0);
dataView.setUint8(0, 5);
32.2 元素類型
| 元素 | Typed Array | 位元組 | 說明 | |
|---|---|---|---|---|
Int8 |
Int8Array |
1 | 8 位元有號整數 | ES6 |
Uint8 |
Uint8Array |
1 | 8 位元無號整數 | ES6 |
Uint8C |
Uint8ClampedArray |
1 | 8 位元無號整數 | ES6 |
| (強制轉換) | ES6 | |||
Int16 |
Int16Array |
2 | 16 位元有號整數 | ES6 |
Uint16 |
Uint16Array |
2 | 16 位元無號整數 | ES6 |
Int32 |
Int32Array |
4 | 32 位元有號整數 | ES6 |
Uint32 |
Uint32Array |
4 | 32 位元無號整數 | ES6 |
BigInt64 |
BigInt64Array |
8 | 64 位元有號整數 | ES2020 |
BigUint64 |
BigUint64Array |
8 | 64 位元無號整數 | ES2020 |
Float32 |
Float32Array |
4 | 32 位元浮點數 | ES6 |
Float64 |
Float64Array |
8 | 64 位元浮點數 | ES6 |
表 20 列出可用的元素類型。這些類型(例如 Int32)會出現在兩個位置
在 Typed Array 中,它們指定元素的類型。例如,
Int32Array的所有元素都具有Int32類型。元素類型是 Typed Array 中唯一不同的面向。在 DataView 中,它們是當您使用
.getInt32()和.setInt32()等方法時,用來存取 ArrayBuffer 的透鏡。
元素類型 Uint8C 很特別:它不受 DataView 支援,而且僅存在於啟用 Uint8ClampedArray 的情況。此 Typed Array 由 canvas 元素使用(在此取代 CanvasPixelArray),否則應避免使用。Uint8C 和 Uint8 之間唯一的差異在於如何處理溢位和下溢(如 下一個小節 所述)。
Typed Array 和 Array Buffer 使用數字和大整數來匯入和匯出值
類型
BigInt64和BigUint64透過大整數處理。例如,設定器接受大整數,而取得器傳回大整數。所有其他元素類型都透過數字處理。
32.2.1 處理溢位和下溢
通常,當值超出元素類型的範圍時,會使用模數運算將其轉換為範圍內的數值。對於有號和無號整數,這表示
- 最高值加上一會轉換為最低值(對於無號整數為 0)。
- 最低值減一會轉換為最高值。
下列函數有助於說明轉換如何運作
function setAndGet(typedArray, value) {
  typedArray[0] = value;
  return typedArray[0];
}
無號 8 位元整數的模數轉換
const uint8 = new Uint8Array(1);

// Highest value of range
assert.equal(setAndGet(uint8, 255), 255);
// Overflow
assert.equal(setAndGet(uint8, 256), 0);

// Lowest value of range
assert.equal(setAndGet(uint8, 0), 0);
// Underflow
assert.equal(setAndGet(uint8, -1), 255);
有號 8 位元整數的模數轉換
const int8 = new Int8Array(1);

// Highest value of range
assert.equal(setAndGet(int8, 127), 127);
// Overflow
assert.equal(setAndGet(int8, 128), -128);

// Lowest value of range
assert.equal(setAndGet(int8, -128), -128);
// Underflow
assert.equal(setAndGet(int8, -129), 127);
箝制轉換不同
- 所有下溢值都轉換為最低值。
- 所有溢位值都轉換為最高值。
const uint8c = new Uint8ClampedArray(1);

// Highest value of range
assert.equal(setAndGet(uint8c, 255), 255);
// Overflow
assert.equal(setAndGet(uint8c, 256), 255);

// Lowest value of range
assert.equal(setAndGet(uint8c, 0), 0);
// Underflow
assert.equal(setAndGet(uint8c, -1), 0);
32.2.2 位元序
每當類型(例如 Uint16)儲存為多個位元組的序列時,位元序很重要
- 大端序:最高有效位元組優先。例如,
Uint16值 0x4321 儲存為兩個位元組,首先是 0x43,然後是 0x21。 - 小端序:最低有效位元組優先。例如,
Uint16值 0x4321 儲存為兩個位元組,首先是 0x21,然後是 0x43。
位元序傾向於針對每個 CPU 架構固定,並且在原生 API 中保持一致。Typed Array 用於與這些 API 通訊,這就是其位元序遵循平台位元序的原因,而且無法變更。
另一方面,通訊協定和二進位檔案的位元序會有所不同,但針對每個格式固定,跨平台一致。因此,我們必須能夠以任一種位元序存取資料。DataViews 服務此用例,讓您在取得或設定值時指定位元序。
- 大端序表示法是資料網路中最常見的慣例;網際網路協定組的協定中的欄位,例如 IPv4、IPv6、TCP 和 UDP,都是以大端序傳輸。因此,大端序位元組順序也稱為網路位元組順序。
- 小端序儲存廣泛用於微處理器,部分原因是 Intel Corporation 對微處理器設計有重大的歷史影響。
其他順序也是可能的。這些通常稱為中間端序或混合端序。
32.3 更多關於 Typed Array 的資訊
在此區段中,«ElementType»Array 代表 Int8Array、Uint8Array 等。ElementType 是 Int8、Uint8 等。
32.3.1 靜態方法 «ElementType»Array.from()
此方法具有類型簽章
.from<S>(
  source: Iterable<S>|ArrayLike<S>,
  mapfn?: S => ElementType, thisArg?: any)
  : «ElementType»Array
.from() 將 source 轉換成 this 的執行個體(Typed Array)。
例如,一般陣列是可迭代的,而且可以使用此方法轉換
assert.deepEqual(
  Uint16Array.from([0, 1, 2]),
  Uint16Array.of(0, 1, 2));
Typed Array 也是可迭代的
assert.deepEqual(
  Uint16Array.from(Uint8Array.of(0, 1, 2)),
  Uint16Array.of(0, 1, 2));
source 也可以是 類陣列物件
assert.deepEqual(
  Uint16Array.from({0:0, 1:1, 2:2, length: 3}),
  Uint16Array.of(0, 1, 2));
選擇性的 mapfn 讓您可以在 source 的元素變成結果元素之前轉換它們。為何要一次執行兩個步驟對應和轉換?與透過 .map() 分開對應相比,有兩個優點
- 不需要中間陣列或 Typed Array。
- 在不同精度的 Typed Array 之間轉換時,較不容易出錯。
請繼續閱讀以了解第二個優點的說明。
32.3.1.1 陷阱:在 Typed Array 類型之間轉換時對應
靜態方法 .from() 可以選擇性地對應和在 Typed Array 類型之間轉換。如果您使用該方法,較不容易出錯。
讓我們先將 Typed Array 轉換成精度較高的 Typed Array,以了解原因。如果我們使用 .from() 來對應,結果會自動正確。否則,您必須先轉換,然後再對應。
const typedArray = Int8Array.of(127, 126, 125);
assert.deepEqual(
  Int16Array.from(typedArray, x => x * 2),
  Int16Array.of(254, 252, 250));

assert.deepEqual(
  Int16Array.from(typedArray).map(x => x * 2),
  Int16Array.of(254, 252, 250)); // OK
assert.deepEqual(
  Int16Array.from(typedArray.map(x => x * 2)),
  Int16Array.of(-2, -4, -6)); // wrong
如果我們從 Typed Array 轉換成精度較低的 Typed Array,透過 .from() 對應會產生正確的結果。否則,我們必須先對應,然後再轉換。
assert.deepEqual(
  Int8Array.from(Int16Array.of(254, 252, 250), x => x / 2),
  Int8Array.of(127, 126, 125));

assert.deepEqual(
  Int8Array.from(Int16Array.of(254, 252, 250).map(x => x / 2)),
  Int8Array.of(127, 126, 125)); // OK
assert.deepEqual(
  Int8Array.from(Int16Array.of(254, 252, 250)).map(x => x / 2),
  Int8Array.of(-1, -2, -3)); // wrong
問題在於,如果我們透過 .map() 對應,則輸入類型和輸出類型相同。相反地,.from() 從任意輸入類型轉換成您透過接收器指定的輸出類型。
32.3.2 Typed Array 是可迭代的
Typed Array 是 可迭代的。這表示您可以使用 for-of 迴圈和其他基於迭代的機制
const ui8 = Uint8Array.of(0, 1, 2);
for (const byte of ui8) {
  console.log(byte);
}
// Output:
// 0
// 1
// 2
ArrayBuffer 和 DataView 不是可迭代的。
32.3.3 Typed Array 與一般陣列
Typed Array 很像一般陣列:它們有 .length,元素可以透過方括號運算子 [] 存取,而且它們有大多數的標準陣列方法。它們與一般陣列的差異如下
Typed Array 有緩衝區。Typed Array
ta的元素不會儲存在ta中,它們會儲存在關聯的 ArrayBuffer 中,可以透過ta.buffer存取const ta = new Uint16Array(2); // 2 elements assert.deepEqual( ta.buffer, new ArrayBuffer(4)); // 4 bytes類型化陣列會初始化為零
new Array(4)會建立一個沒有任何元素的常規陣列。它只有四個「孔洞」(小於.length的索引,沒有關聯的元素)。new Uint8Array(4)會建立一個類型化陣列,其四個元素都是 0。
assert.deepEqual(new Uint8Array(4), Uint8Array.of(0, 0, 0, 0));類型化陣列的所有元素都有相同的類型
設定元素會將值轉換為該類型。
const ta = new Uint8Array(1);

ta[0] = 257;
assert.equal(ta[0], 1); // 257 % 256 (overflow)

ta[0] = '2';
assert.equal(ta[0], 2);
取得元素會傳回數字或大整數。
const ta = new Uint8Array(1);
assert.equal(ta[0], 0);
assert.equal(typeof ta[0], 'number');
類型化陣列的
.length是從其 ArrayBuffer 衍生的,且永遠不會改變(除非你切換到不同的 ArrayBuffer)。常規陣列可以有孔洞;類型化陣列不行。
32.3.4 將類型化陣列轉換為常規陣列,反之亦然
要將常規陣列轉換為類型化陣列,請將其傳遞給類型化陣列建構函數(它接受類陣列物件和類型化陣列)或傳遞給 «ElementType»Array.from()(它接受可迭代物件和類陣列物件)。例如
const ta1 = new Uint8Array([0, 1, 2]);
const ta2 = Uint8Array.from([0, 1, 2]);
assert.deepEqual(ta1, ta2);
要將類型化陣列轉換為常規陣列,你可以使用 Array.from() 或展開(因為類型化陣列是可迭代的)
assert.deepEqual(
  [...Uint8Array.of(0, 1, 2)], [0, 1, 2]
);
assert.deepEqual(
  Array.from(Uint8Array.of(0, 1, 2)), [0, 1, 2]
);
32.3.5 串接類型化陣列
類型化陣列沒有 .concat() 方法,就像常規陣列一樣。解決方法是使用它們的重載方法 .set()
.set(typedArray: TypedArray, offset=0): void
.set(arrayLike: ArrayLike<number>, offset=0): void
它會將現有的 typedArray 或 arrayLike 複製到接收器中,索引為 offset。TypedArray 是所有具體類型化陣列類別的虛構抽象超類別。
下列函數使用該方法將零個或多個類型化陣列(或類陣列物件)複製到 resultConstructor 的執行個體中
function concatenate(resultConstructor, ...arrays) {
  let totalLength = 0;
  for (const arr of arrays) {
    totalLength += arr.length;
  }
  const result = new resultConstructor(totalLength);
  let offset = 0;
  for (const arr of arrays) {
    result.set(arr, offset);
    offset += arr.length;
  }
  return result;
}
assert.deepEqual(
  concatenate(Uint8Array, Uint8Array.of(1, 2), [3, 4]),
  Uint8Array.of(1, 2, 3, 4));
32.4 快速參考:索引與偏移
在準備 ArrayBuffers、類型化陣列和 DataViews 的快速參考時,我們需要了解索引和偏移的差異
方括號運算子
[ ]的索引:你只能使用非負索引(從 0 開始)。在常規陣列中,寫入負索引會建立屬性
const arr = [6, 7];
arr[-1] = 5;
assert.deepEqual(
  Object.keys(arr), ['0', '1', '-1']);
在類型化陣列中,寫入負索引會被忽略
const tarr = Uint8Array.of(6, 7);
tarr[-1] = 5;
assert.deepEqual(
  Object.keys(tarr), ['0', '1']);
ArrayBuffers、類型化陣列和 DataViews 方法的索引:每個索引都可以是負數。如果是,它會加到實體的長度中以產生實際索引。因此,
-1指的是最後一個元素,-2指的是倒數第二個元素,依此類推。常規陣列的方法也以相同的方式運作。const ui8 = Uint8Array.of(0, 1, 2); assert.deepEqual(ui8.slice(-1), Uint8Array.of(2));傳遞給類型化陣列和 DataViews 方法的偏移:必須是非負數,例如
const dataView = new DataView(new ArrayBuffer(4));
assert.throws(
  () => dataView.getUint8(-1),
  {
    name: 'RangeError',
    message: 'Offset is outside the bounds of the DataView',
  });
參數是索引還是偏移只能透過查看文件來確定;沒有簡單的規則。
32.5 快速參考:ArrayBuffers
ArrayBuffers 儲存二進位資料,這些資料旨在透過類型化陣列和 DataViews 來存取。
32.5.1 new ArrayBuffer()
建構函數的類型簽章為
new ArrayBuffer(length: number)透過 new 呼叫這個建構函數會建立一個容量為 length 位元的執行個體。這些位元中的每一個最初都是 0。
你無法變更 ArrayBuffer 的長度;你只能建立一個長度不同的新 ArrayBuffer。
32.5.2 ArrayBuffer 的靜態方法
ArrayBuffer.isView(arg: any)如果
arg是物件且為 ArrayBuffer 的檢視(亦即,如果是 Typed Array 或 DataView),則傳回true。
32.5.3 ArrayBuffer.prototype 的屬性
get .byteLength(): number傳回此 ArrayBuffer 的容量(以位元組為單位)。
.slice(startIndex: number, endIndex=this.byteLength)建立一個新的 ArrayBuffer,其中包含此 ArrayBuffer 的位元組,其索引大於或等於
startIndex且小於endIndex。start和endIndex可以為負值(請參閱 §32.4「快速參考:索引與偏移」)。
32.6 快速參考:Typed Array
各種 Typed Array 物件的屬性分兩步驟介紹
TypedArray:首先,我們來看所有 Typed Array 類別的抽象超類別(如本章 開頭的類別圖 所示)。我稱該超類別為TypedArray,但無法直接從 JavaScript 存取。TypedArray.prototype包含所有 Typed Array 的方法。«ElementType»Array:具體的 Typed Array 類別稱為Uint8Array、Int16Array、Float32Array等。這些類別是您透過new、.of和.from()使用的類別。
32.6.1 TypedArray<T> 的靜態方法
兩個靜態 TypedArray 方法都由其子類別(Uint8Array 等)繼承。TypedArray 是抽象的。因此,您總是透過子類別使用這些方法,而子類別是具體的,可以有直接實例。
.from<S>(source: Iterable<S>|ArrayLike<S>, mapfn?: S => T, thisArg?: any) : instanceof this將可迭代的(包括陣列和 Typed Array)或 類陣列物件 轉換為
this的實例(instanceof this是我發明的,用來表達這個事實)。assert.deepEqual( Uint16Array.from([0, 1, 2]), Uint16Array.of(0, 1, 2));選擇性的
mapfn讓您在source的元素成為結果的元素之前,轉換這些元素。assert.deepEqual( Int16Array.from(Int8Array.of(127, 126, 125), x => x * 2), Int16Array.of(254, 252, 250));.of(...items: bigint[]): instanceof this(BigInt64Array、BigUint64Array).of(...items: number[]): instanceof this(所有其他 Typed Array)建立
this的新實例,其元素為items(強制轉換為元素類型)。assert.deepEqual( Int16Array.of(-1234, 5, 67), new Int16Array([-1234, 5, 67]) );
32.6.2 TypedArray<T>.prototype 的屬性
由打字陣列方法接受的索引可以為負數(它們以傳統陣列方法的方式運作)。偏移量必須為非負數。有關詳細資訊,請參閱§32.4「快速參考:索引與偏移量」。
32.6.2.1 特定於打字陣列的屬性
下列屬性特定於打字陣列;一般陣列沒有這些屬性
get .buffer(): ArrayBuffer傳回支援此打字陣列的緩衝區。
get .length(): number傳回此打字陣列緩衝區中的元素長度。
get .byteLength(): number傳回此打字陣列緩衝區的位元組大小。
get .byteOffset(): number傳回此打字陣列在其 ArrayBuffer 中「開始」的偏移量。
.set(typedArray: TypedArray, offset=0): void.set(arrayLike: ArrayLike<bigint>, offset=0): void(BigInt64Array、BigUint64Array).set(arrayLike: ArrayLike<number>, offset=0): void(所有其他打字陣列)將第一個參數的所有元素複製到此打字陣列。參數的索引 0 處的元素寫入此打字陣列的索引
offset(依此類推)。有關類陣列物件的更多資訊,請參閱§31.5「類陣列物件」。.subarray(startIndex=0, endIndex=this.length): TypedArray<T>傳回一個新的打字陣列,其緩衝區與此打字陣列相同,但範圍(通常)較小。如果
startIndex為非負數,則結果打字陣列的第一個元素為this[startIndex],第二個為this[startIndex+1](依此類推)。如果startIndex為負數,則會適當地轉換。
32.6.2.2 陣列方法
下列方法基本上與一般陣列的方法相同
.at(index: number): T | undefined[R, ES2022].copyWithin(target: number, start: number, end=this.length): this[W, ES6].entries(): Iterable<[number, T]>[R, ES6].every(callback: (value: T, index: number, array: TypedArray<T>) => boolean, thisArg?: any): boolean[R, ES6].fill(value: T, start=0, end=this.length): this[W, ES6].filter(callback: (value: T, index: number, array: TypedArray<T>) => any, thisArg?: any): T[][R, ES6].find(predicate: (value: T, index: number, obj: T[]) => boolean, thisArg?: any): T | undefined[R, ES6].findIndex(predicate: (value: T, index: number, obj: T[]) => boolean, thisArg?: any): number[R, ES6].forEach(callback: (value: T, index: number, array: TypedArray<T>) => void, thisArg?: any): void[R, ES6].includes(searchElement: T, fromIndex=0): boolean[R, ES2016].indexOf(searchElement: T, fromIndex=0): number[R, ES6].join(separator = ','): string[R, ES6].keys(): Iterable<number>[R, ES6].lastIndexOf(searchElement: T, fromIndex=this.length-1): number[R, ES6].map<U>(mapFunc: (value: T, index: number, array: TypedArray<T>) => U, thisArg?: any): U[][R, ES6].reduce<U>(callback: (accumulator: U, element: T, index: number, array: T[]) => U, init?: U): U[R, ES6].reduceRight<U>(callback: (accumulator: U, element: T, index: number, array: T[]) => U, init?: U): U[R, ES6].reverse(): this[W, ES6].slice(start=0, end=this.length): T[][R, ES6].some(callback: (value: T, index: number, array: TypedArray<T>) => boolean, thisArg?: any): boolean[R, ES6].sort(compareFunc?: (a: T, b: T) => number): this[W, ES6].toString(): string[R, ES6].values(): Iterable<T>[R, ES6]
有關這些方法如何運作的詳細資訊,請參閱 §31.13.3 “Array.prototype 的方法”。
32.6.3 new «ElementType»Array()
每個 Typed Array 建構函式都有遵循 «ElementType»Array 模式的名稱,其中 «ElementType» 是開頭表格中的元素類型之一。這表示有 11 個 Typed Array 建構函式
Float32Array、Float64ArrayInt8Array、Int16Array、Int32Array、BigInt64ArrayUint8Array、Uint8ClampedArray、Uint16Array、Uint32Array、BigUint64Array
每個建構函式有四個重載版本,其行為會根據接收到的引數數目及其類型而有所不同
new «ElementType»Array(buffer: ArrayBuffer, byteOffset=0, length=0)建立一個新的
«ElementType»Array,其緩衝區為buffer。它會從指定的byteOffset開始存取緩衝區,並且會有指定的length。請注意,length會計算 Typed Array 的元素(每個 1–8 位元組),而不是位元組。new «ElementType»Array(length=0)建立一個新的
«ElementType»Array,其length為指定值,並使用適當的緩衝區。緩衝區的位元組大小為length * «ElementType»Array.BYTES_PER_ELEMENTnew «ElementType»Array(source: TypedArray)建立一個新的
«ElementType»Array,其元素與source的元素具有相同的值,但會強制轉換為ElementType。new «ElementType»Array(source: ArrayLike<bigint>)(BigInt64Array、BigUint64Array)new «ElementType»Array(source: ArrayLike<number>)(所有其他 Typed Array)建立一個新的
«ElementType»Array,其元素與source的元素具有相同的值,但會強制轉換為ElementType。有關類陣列物件的更多資訊,請參閱 §31.5 “類陣列物件”。
32.6.4 «ElementType»Array 的靜態屬性
«ElementType»Array.BYTES_PER_ELEMENT: number計算儲存單一元素所需位元組數
> Uint8Array.BYTES_PER_ELEMENT
1
> Int16Array.BYTES_PER_ELEMENT
2
> Float64Array.BYTES_PER_ELEMENT
8
32.6.5 «ElementType»Array.prototype 的屬性
.BYTES_PER_ELEMENT: 數字與
«ElementType»Array.BYTES_PER_ELEMENT相同。
32.7 快速參考:DataView
32.7.1 new DataView()
建立一個新的 DataView,其資料儲存在 ArrayBuffernew DataView(buffer: ArrayBuffer, byteOffset=0, byteLength=buffer.byteLength-byteOffset)buffer中。預設情況下,新的 DataView 可以存取所有buffer。最後兩個參數允許您變更這個設定。
32.7.2 DataView.prototype 的屬性
在本節的其餘部分中,«ElementType» 指下列任一項
Int8、Int16、Int32、BigInt64Uint8、Uint16、Uint32、BigUint64Float32、Float64
以下是 DataView.prototype 的屬性
get .buffer(): ArrayBuffer傳回此 DataView 的 ArrayBuffer。
get .byteLength(): number傳回此 DataView 可以存取的位元組數。
get .byteOffset(): number傳回此 DataView 開始存取其緩衝區中位元組的偏移量。
.get«ElementType»(byteOffset: 數字, littleEndian=false): bigint(BigInt64、BigUint64).get«ElementType»(byteOffset: 數字, littleEndian=false): 數字(所有其他元素類型)從此 DataView 的緩衝區中讀取一個值。
.set«ElementType»(byteOffset: 數字, 值: bigint, littleEndian=false): void(BigInt64、BigUint64).set«ElementType»(byteOffset: 數字, 值: 數字, littleEndian=false): void(所有其他元素類型)將
value寫入此 DataView 的緩衝區。